


Optimal height of a wicking bed depends on what you plant
Planning the optimal height of wicking beds
There is only really one rule when it comes to the optimal height of wicking beds. That is: the science of capillary action determines that the vertical wicking distance is generally around 300mm. The actual height of your wicking bed can, however, vary provided you follow this simple rule.
Wicking beds as a series of layers
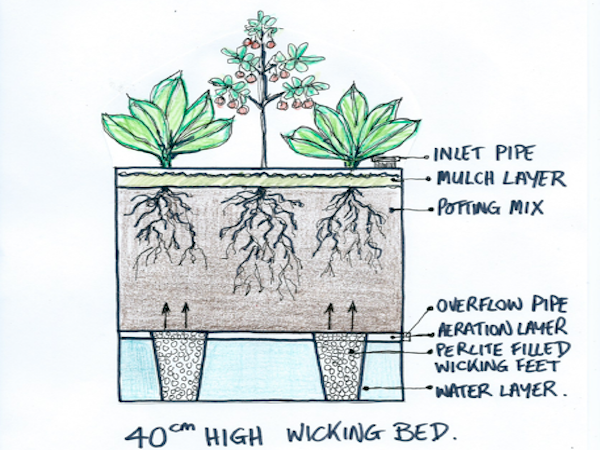
In my view the best way to understand wicking beds is to view them as a growing system comprised of a series of layers. Starting at the top you have the following layers:-
Mulch layer
A 30 to 50mm layer of organic mulch separates the soil surface from the atmosphere. It acts as an important soil insulator and reduces soil moisture loss and evapotranspiration. Click here for more information on the importance of mulch in wicking beds.
Soil layer
The soil layer is your growing medium. It is where your plants derive most of their nutrients and water. The depth of your soil layer can vary depending on what you are growing. Click here for more information on soil in wicking beds.
Planting Seeds - 150 to 200mm of soil would be optimal.
Vegetable Seedlings - As little as 200mm of soil would be suitable for leafy greens. If you are planting carrots or other deeper rooting vegetables your soil depth could extend to 350mm.
Shrubs and Small Trees - Soil depth will depend largely on the size of the root ball of the tree that you are planting. As a guide the optimal soil depth can be calculated by adding 300mm to the vertical height of the root ball. Using this basic formula, you could use the following soil depths as a guide for established seedlings:-
- Blueberries - 350 to 450mm. These grow particularly well in wicking beds as they like a lot of water. Click here to read more about growing Blueberries in a wicking bed
- Raspberries - 350 to 450mm
- Dwarf Apple, Nectarines, Cherry, Plum and Peach Trees - 400 to 500mm
- Pomegranates - 400 to 500mm
Which in turn will give you the optimal height of wicking beds for the above plants, when you take into account the aeration and water layers.
Aeration layer
In all WaterUps® wicking beds there is an aeration layer of a minimum of 18mm, measured when the water reservoir is full. This is where the overflow pipe is located and helps prevent the soil from becoming anaerobic. The size of the aeration layer, however, will increase as the water level in the reservoir drops and narrow again when the reservoir is refilled.
Water reservoir layer
The depth of the water reservoir in WaterUs® beds is 120mm. We have found that this generally provides sufficient water for approximately 1 month before needing to be refilled.
Wicking bed base
The Base is located at the bottom of the water reservoir layer. For most wicking beds, the Base is situated at ground level. However, if you are building an in-ground wicking bed then the Base would be 120mm below ground to ensure that the overflow pipe can still function.
Some people, particularly older gardeners, don’t like to bend down too much so prefer to have their garden beds raised up. With a wicking bed this can be easily achieved by raising up the height of the Base. To do this you can position the Base on a layer of compacted soil. We would recommend using a compacted subgrade or road base type material that will ensure a level base that won’t subside unevenly. It is often also a good idea to place a sheet of corflute on top of the compacted soil.
You could build a false bottom to a raised timber bed and use the bottom section for storage. Again, we would suggest placing a sheet of corflute under the water reservoir liner. We have seen some great timber wicking beds built by our installers that incorporate storages space underneath with the top of the bed at a height of 800mm.
You could also build a wicking bed on legs which can be used for wheelchair access as well. Click here to read more about gardening therapy and raising the height of your wicking bed.
The timber wicking beds below, built by Josh at Wicking Bed Brothers, are a good example of how you can build wicking beds of different heights and create storage under your raised bed or planter.
Also, if you are wanting to convert an existing raised bed into a wicking bed you may just want to adjust the wicking height to make it optimal for what you want to grow. For example, you may be starting with a 600mm high raised bed, but only want to grow leafy greens. This could be filled to the desired level with a road base type material and compacted and levelled before installing the reservoir liner and WaterUps®wicking cells.

WaterUps® Raised Beds
With our Oasis Wicking Beds, the height is 450mm. Assuming 30mm of mulch this would give you a soil depth of 282mm. This would be suitable for any herbs and leafy greens and root vegetables. I have even been able to successfully grow Blueberries, Wild Raspberries, Grapes and some shrubs including Azaleas and Gardenias in these beds.
Timber Beds - If you are considering building your own timber beds you will find that most sleepers will come in 200mm widths. For this reason we suggest that you use a 400mm high bed for herbs and vegetables and a 600mm high bed for trees and shrubs with established root balls.
These measurements should set you up to have the optimal height of wicking beds in your garden.
Optimal Height of Wicking Beds - Other Factors
Rule of thumb when planting seedlings in a wicking bed
The root systems of most plants will extend down once they become established, particularly if the soil below contains more moisture. If you fill up the reservoir when you plant your seedlings, the roots will grow down as the water level falls. By the time the reservoir is almost empty, it is reasonable to assume that the roots of your newly planted seedlings will have extended down by at least 120mm, which is the height of the WaterUps® reservoir.
Therefore, when calculating the maximum height of your wicking bed, we suggest that you use the distance from the top of the WaterUps® reservoir to the level where the roots of your seedlings sit on initial planting. This should be no more than 300mmm.
Common Misconceptions with Wicking Bed Heights and Reservoir Depths
We are often asked whether the water reservoir can be linked in to an automatic watering system so that it can be kept full. By doing this, there was a view that you could increase the soil height because the bed would always ‘wick’ from the top of the reservoir.
While this is technically correct, it would not be conducive to maintaining a healthy growing environment for your plants. The soil in a wicking bed requires aeration to ensure optimal functioning and we recommend that you allow the reservoir to almost fully empty before refilling. This enhances aeration of the soil, which is important to soil health and ensures that your wicking bed does not become anaerobic. If you do want to link your wicking bed to an automatic refilling system, you would need to consider having this activated by a moisture sensor near the Base.
At WaterUps® we prefer to get to know our gardens. A glance at the leaves of our plants and a dipstick to poke down the Inlet Pipe and measure the water level, will tell us when to refill our wicking bed.


