How to make a Wicking Garden bed using WaterUps
This guide covers the A-Z of how to make a wicking garden bed using WaterUps for a variety of garden bed installations. To view the full guide and images we suggest that you download the WaterUps Installation Guide.
Additional information specific to your situation may also be found in the individual guides on the website.
The size of your wicking bed
WaterUps are recycled plastic modular units, which allow you to construct a wicking bed of almost any length, width, shape, and size. Consideration needs to be given to the height of the bed. From the base, you will need to allow 130mm for the cell height. Given that a good potting mix will generate efficient wicking up to a height of around 350mm, we use a height of 450mm for our Oasis steel beds, but suggest 400mm for raised timber beds. This allows you to use standard 200mm wide timber sleepers.
The final height of the walls of your bed can also depend on what you intend to grow:
- There is no reason, for example, why you couldn’t put WaterUps cells in a window box or herb garden planter with a potting mix depth of only 150mm, as the root systems of these plants are often shallow.
- Similarly, you could put a citrus tree in 600mm of potting mix, provided that the base of the root ball sits at around 350mm above the bottom of the wicking bed.
Click here the read our Blog Post – ‘The optimal height of wicking beds depends on what you plant’
Construction Materials
WaterUps wicking systems can be constructed using most landscaping materials – timber sleepers, corrugated iron, brick or stone, and synthetic wood made from recycled plastics. We do not recommend the use of CCA treated pine due to issues around leaching of the toxic treatment materials. Ironwood® Sienna sleepers, which are treated with MicroPro® micronized based preservative are, however, graded by the manufacturer as suitable for sensitive applications such as vegetable gardens. Cypress pine sleepers are also suitable construction material for raised beds, but they are more expensive and not always readily available.
Quick Tip for Timber Raised Beds
If you are using Ironwood® Sienna sleepers, then it is probably worth running the pond liner up to the top of the bed and securing it with staples. This will prevent any possibility of your soil coming into contact with the timber and will also give the timber sleepers greater longevity.
You can also fit WaterUps to Intermediate Bulk Containers (IBCs) and to virtually any planter tubs.
Other materials needed
Pond liner
You will need a minimum thickness liner of 0.5mm. When choosing a pond liner you should be aware that PVC liners are not classified as food grade. We recommend that they be used only for ornamentals, if at all. We recommend against using builders’ plastic, as this does not have the durability of pond liner. The best pond liners are those manufactured from polyethylene and polypropylene such as LLDPE, HDPE, RPP and RPE.
To work out how much pond liner you will need we suggest that you use the calculator tool on our website which you can go to using the link below.
Further Information Click go to the WaterUps Product Calculator.
WaterUps Reservoir Liners
Alternatively, you could use one of the WaterUps reservoir liners which have been specifically designed to eliminate the need to cut pond liner. Currently, they are available in 4 sizes:
- 1600mm x 800mm
- 1200mm x 400mm
- 800mm x 800mm
- 2000mm x 400mm
For more information refer to the Products Page on our website.
Geotextile Fabric
Geotextile fabrics, which are permeable fabrics made from either polypropylene or polyester are often used in landscaping for filtering, draining, and separating soil. They may be required in some situations:
- We normally recommend that GeoTec be placed around the internal walls to cover where the cells abut the walls. However, if the bed has been constructed so that the gap between the edge of the cells and the walls is less than 5mm, then GeoTec will not be required.
- In order to prevent root intrusion into the water reservoir, a layer of GeoTec may be placed over the top of the cells. When doing this it is important to ensure that the perlite in the wicks is mounded slightly higher than the top of the cell. Refer section below on Perlite in the Wicks in this guide for more detail.
- GeoTec can be also used under the reservoir in the base. Refer to the Level Base section below in this guide for more detail.
- Where you have had to cut through the wicks/or feet of a WaterUps cell in order to retro-fit an existing bed, you will need to use GeoTec to cover this area to ensure that soil does not get into the water reservoir below.
Level base
The first requirement for installation of a WaterUps wicking bed is the selection of a site suited to the plants or crop to be grown, which is both level and solid from any sinkage or compression under the WaterUps cell base. If necessary, level the site and compact the area so the wicking bed will always remain level. Depending on the condition of the base soil you may wish to add 30mm of compacted road base or crusher dust to make the base more solid. If the base is level but contains rough materials, such as blue metal, you may wish to cover this with GeoTec, and possible even a sheet of Coreflute to protect the pond liner. GeoTec can also be used to cover a sand base that is not fully compacted to provide additional support for the WaterUps cell base. A sheet of corflute can also be used to help provide a firm platform for the cells to sit on.
Constructing a new wicking bed
For new constructions, how to make a wicking garden bed is super easy if you decide to buy one of our Oasis Raised Garden Bed Planters (hyperlink to new Oasis page) as they come with the full bed and wicking components together as one kit. You just need to assemble per the instructions, add soil and your plants.
For larger or custom design, if you are constructing a new bed, the optimal internal dimensions should be in multiples of WaterUps cells, ie 400mm x 400mm, plus an allowance for the pond liner of say 2.5mm on each side.
Retro-fitting an existing raised bed
You can retro-fit WaterUps cells to most existing raised beds. WaterUps wicking systems can also be installed in most pots, troughs, and planters, which can be sealed or waterproofed. WaterUps cells can be cut to fit the desired internal dimensions and shape of the growing area by using a saw, or jigsaw for rounded sections. The best way to do this is to lay out a base of cells larger than the area required. Then, place the border, eg. corrugated steel bed frame, on top as the template for any cutting required. Trace around the perimeter with a white paint marker. Work out the best positioning of the frame, aiming as much as possible to avoid cutting through any of the wicks. While this may not always be possible, it is not a problem as the area can be covered with GeoTec fabric to ensure that soil does not penetrate the water reservoir. If the resulting gap between the top of the cell at the wall of your bed is more than 10mm, you can also screw/ staple on a piece of Corflute (corrugated plastic) to the top of the adjacent WaterUps cell to cover the area, and then cover with GeoTec.
OK, HERE WE GO…
Pond liner
Ensure that the compacted base of the bed is free from sharp objects that could damage the pond liner. This can be achieved by laying GeoTec fabric or Corflute underneath the pond liner. Refer Figure 1.
Ensure that the pond liner is pushed into each corner of the base. Before the liner is placed in position and the overflow pipe is installed, ensure that the liner extends at least 200mm above the base. Refer Figure 2.
Further Information
Click here to view our video on how to clip the corner tabs of the WaterUps Reservoir Liners
Quick Tips
- At this stage, it is a good idea to attach the liner to the internal walls of your bed to make it easier to add the remaining cells. You can use galvanized clouts or staples for timber beds or Gaffer tape for steel and other types of beds.
- If you are retrofitting an old planter or pot you will need to block/seal the drainage hole in the base.
- Your pond liner will be more flexible and easier to use if it is left out in the sum for half an hour before installing.
- Use a spirit level to check that your wicking bed is sitting on a level base.
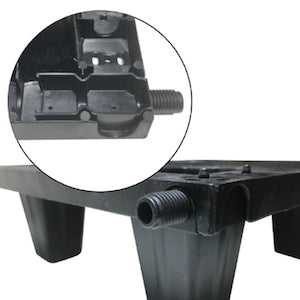
Installing WaterUps overflow pipe
The WaterUps overflow pipe system has a threaded pipe with a washer and nut to secure the pipe to the wall of the bed. The pipes are available in a short and long version.
- Short 20mm screw overflow pipe for use with corro beds and other beds with walls thinner than 15mm
- Long 70mm screw overflow pipe for thicker-walled beds such as timber sleepers.
Attach the overflow pipe to the space provided on the underside of the WaterUps cell and click into position.
Move the cell into a place where the location of the overflow pipe can be marked against the inside wall of the bed for drilling. Refer Figure 3. Once the hole has been drilled, using an 18mm speed bore or hole saw, mark the position of the overflow pipe on the pond liner with a white marker pen.
Then using a knife cut out the hole as marked on the pond liner to align with the pre-drilled hole. Refer Figure 4.
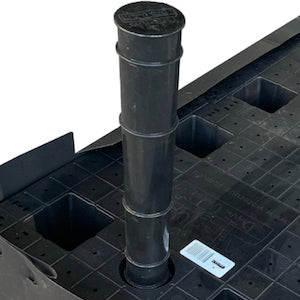
Insert the WaterUps inlet pipe
The WaterUps black inlet pipe has 3 lugs at the base that slot into the 3 matching holes in the inlet pipe recess on each cell. Refer to image.
To insert the inlet pipe. There is a marked circle on each WaterUps cell to indicate where to attach the inlet pipe.
- Use a Stanley knife, or equivalent, to cut along the inner grove to remove the circle containing the text.
- Ensure that the lugs on the pipe align with the holes in the inlet pipe recess on the cell and push the black inlet pipe until it locks in position.
- To fill the reservoir put the hose into the inlet pipe and push it down to the bottom of the bed. This helps prevent reflux up through the top of the WaterUps cells.
Adding the WaterUps cells
You will already have positioned the WaterUps cells containing the inlet and overflow pipes. The remainder of the cells can now be added and linked together using the joiners supplied. If the WaterUps cells fit tightly together, joiners may not be required.
The last step, prior to filling with potting mix, is to lay some GeoTec (about 100mm wide), if required, around the outer edges of the WaterUps cells where they meet the wall to ensure that dry soil does not get into the water reservoir below, which could occur if the gap is more than 5mm.
WaterUps Wicking Solutions are made from 100% Australian recycled plastic.
As a company we invest heavily in research and development and thus provide affordable wicking solutions and gardening tips that deliver superior results.
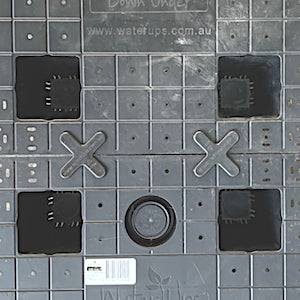
Using WaterUps Joiners
WaterUps Joiners are designed to clip into the round holes on the top of the WaterUps cells to connect the cells together. Refer image.
We recommend using the Joiners to ensure that the cell base of your wicking bed remains even and stable. This is particularly important when you have had to cut cells to fit the shape and size of your garden bed.
To place a WaterUps Joiner push the 4 nobs on the underside of the joiner into the matching round holes on the top of the cells using your thumb or the palm of your hand. This may require some force. Joiners may not be required if you have constructed the bed to fit the cell dimensions and the cells fit firmly to the internal walls.
The Joiners can also be used to secure the flaps on the Reservoir Liners to the top of the cells.
Adding perlite to the wicks in the WaterUps cells
Adding Perlite to the ‘wicks‘ will improve airflow through to the soil. Both fine and medium grain perlite work effectively for this purpose. The wicks, which are the 4 feet at the base of each cell, should be filled with perlite. This will require approximately 2 litres of perlite per WaterUps cell.
To work out how much Perlite you will need, we suggest that you use the calculator tool on our website which you can go to using the link below.
Quick Tip
If you are putting a layer of GeoTec fabric over the top of your cells to protect against root intrusion then you will need to ensure that there is enough perlite in each wick so that it mounds to about 5mm above the height of the cell.
Potting mix for WaterUps wicking beds
For the best advice, we suggest that you speak to a local nursery or landscape supply company to discuss your plans and to get their input on your requirements. Generally, we recommend a mix containing around 50% organic garden mix and 50% compost and organic matter, including mushroom compost and various animal manures. To work out how much potting mix/soil you will need we suggest that you use the calculator tool on our website which you can go to using the link on this page.
This will provide quantities of both bulk and bagged mix.
Quick Tip
If you are purchasing bulk mix check it before it leaves the truck to ensure that it is the premium quality that you ordered.
Adding your soil mix to a WaterUps wicking bed
In order to achieve the most efficient wicking outcome, we suggest:
- that your soil/potting mix should contain a good amount of composted material and organic matter.
- after filling the wicks with perlite add potting mix evenly across the top of the wicking cell platform to a depth of around 10cm. Once this base level has been established give the mix another light spray to assist the compaction. Continue filling the bed with potting mix in layers, giving each layer a light spray of water.
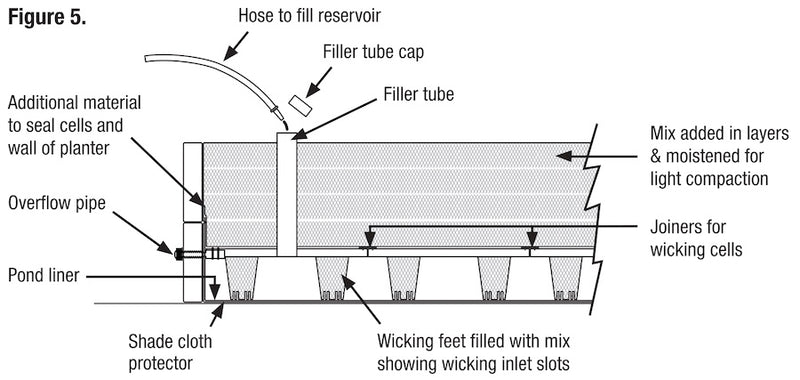
Give the soil in your raised bed a final soak and then insert the hose into the filler pipe and fill with water until you observe the overflow pipe discharging water, which indicates the reservoir is full. Then place the cap on the inlet pipe to prevent insects or other debris from entering the reservoir. Refer Figure 5.
A wicking bed of 1200mm x 2000mm (15 WaterUps cells) will contain almost 300 litres of water. Ideally, allow 24 hours for the soil to ‘wick’ water up into the bed and then fill the reservoir again via the inlet pipe.
The wicking bed is now ready to use. If planting small seedlings, the bed will need surface watering for a couple of days while their roots develop and the wicking action is fully functioning.
Adding mulch to your WaterUps wicking bed
Mulching is vital to keep the top of the soil moist and moderate soil temperature. We suggest a 20mm layer of mulch is applied to the top of the bed. The ideal mulches contain lucerne, sweet pea, sugar cane, pine bark, and tea tree. After mulching give it a light watering to settle it in.
Observing the water level
To check the water level in your wicking bed place a dipstick down the inlet pipe to check the levels each week and only fill when the level drops to less than 1/4 full. In periods of prolonged extremely hot dry weather it may be useful to give your plant a spray of water in the evening if you see the leaves showing signs of heat stress.
Quick Tip
Do not top up the wicking bed’s water reservoir too often. Allow the water level to fall before refilling. This helps with the aeration of the soil.
Soil Biology
Continue to improve your soil biology with the addition of manures, compost and organic matter. This will reward you with nutrient-rich, homegrown, healthy plants. Add worm teas and compost teas reasonably regularly.
For additional information and to view guides on how to install WaterUps in specific situations please refer to the DIY Guides.
For more information on soil and potting mix please refer to our Soil Considerations Guide.
If you have any additional questions on how to make a wicking garden bed beyond what is covered in our Guides and FAQ, please send us a message via our Contact Us page.


